Using an FTP Program
Some common FTP Programs include:
IMPORTANT: YOU SHOULD NOT USE an FTP program if you are using FrontPageŽ. If you are using FrontPageŽ, you must use its built in Publishing feature or else your Front Page server extensions may be corrupted and need to be reinstalled.
One of the most useful utilities available on the Internet is the capability to transfer entire files or directories from your hard drive directly to other computers on the Internet without having to encode them to be sent through email. With FTP, you can connect to various sites throughout the 'Net to download or upload files, provided you know the internet address (i.e. the "this.address.com" address, or the "xxx.xxx.xxx.xxx" numeric address) of the site you want to connect to. FTP programs come in two flavors: those that use a graphical "point-and-click" interface in a windows-type environment, and those that use a textual environment where you type in a command for every action you want to take.
Your default directory name is called /www and all of you site files go there.
One of the most widely used FTP clients (programs), Cute FTP offers a intuitive, easy to understand interface. The screen consists of three sections: above is the server message screen, where you can see what commands are being given by both your FTP program and the server you are on. Whatever action happens between the two computers, you'll see a command in this window. Below this window and to the left is your computer's drive. In here, you can navigate your files and directories by clicking to find the things you want to upload. To the right of this window is the drive of the server you are currently connected to. Directly above both of these windows, you'll see a field telling you the correct directories of both your computer and the server.
Connecting To a Remote Server
Notice that, at startup, Cute FTP has many FTP sites already listed and ready for you to connect to in the FTP Site Manager, which comes up by default when you start the program. These are sites to various hardware and software companies that allow you to directly download add-ons to existing software packages you may have. Also included in the list are many public archives where you can find many different types of software, from computer games to the latest shareware programs.
To connect to any one of these servers, just click on the name of the server and hit the "Connect" at the bottom of the Site Manager window. In the top window, you'll see the progress of your login to the server until the server welcome message comes up in a separate dialog window. Click the "OK" bar at the bottom of this window and you're ready to transfer files to/from the server.
Bringing up the Site Manager and Adding a New Server Address
To add a new server to your FTP Site Manager, click on the small folder tree icon to the far left of the toolbar close to the top of the window. This will bring up the Site Manager. To add a connection, highlight the folder where you want to put the new connection and click the "Add site" button under the address window. Next, you'll see the site editor window. Here, in the "Site Label" field, you'll put the name you want to appear in the Site Manager window. This is just a title or label. In the "Host Address" field, put in the actual Internet address for the site, whether it's the name address or the numeric address. The userID and password fields below indicate your ID and password on the site you're connecting to, not necessarily on Iglou. Directly below this, you'll choose the type of connection you want to make to the server; "Normal" indicates you have a unique ID and password for the system, whereas "Anonymous" allows you to connect to the server without actually having your own ID and password for the system. "Double" logs you into the server in two separate sessions. Most servers discourage this. "Transfer Type" refers to whether the file you're transferring is a binary (program file) or an ASCII file (text). "Auto Detect" will, of course, detect the file type automatically each time you transfer a file. We recommend Auto Detect. Up and to the right are the initial starting directories for your connection. These are the directories that your program will look at, both on your computer and the server. Below is the server port your program will attempt to connect to (the default port of 21 is generally to one to use), the number of times it will retry connecting to the server if it doesn't get on, and the delay time between retries. When you're finished entering the information for the server, click 'OK' to save it to the folder you specified.
Folder and Site Management
In the FTP Site Manager below both the folders window and the Sites window, you can edit, add, or delete folders or specific sites by clicking on the buttons below them. The buttons themselves are labeled and their functions are straightforward. To delete a site or a folder, first click once on that folder and click the "Delete Site" or "Delete Folder" button.
File Management
In either the local or remote windows, you can highlight a filename; click the right mouse button to gain access to various file management tools such as:
Creating a Quick, Temporary Connection
To create a temporary connection, click the lightning bold on the toolbar. In the connect window, put the host address of the server (either the numeric or the name address). Below, put your username and password for the system. Beneath are the "Login Type" (normal, anonymous, double) and "Transfer Type" (Binary, ASCII, Auto) fields. Everything in the left column can be set to the default values. To change the port that CuteFTP will look for a connection on, click the 'Advanced' tab across the top and change the port number. Hitting 'OK' will connect you to the server.
Something to take note of here is the "History" field in the general section of this window; if you are connecting to multiple sites repeatedly, you can call up a previous connection by clicking the down arrow to the right of the field and clicking on one of the previous connections.
Uploading/Downloading Files Between the Server and Your Machine
Just as retrieving files from a remote location is termed "downloading", sending a file to a remote server is termed "uploading". To upload a file to a server, simply either double-click the file (it will automatically begin sending), or highlight the filename, click the right mouse button, and choose the "Upload" option. Likewise to download, just double-click the filename on the server or highlight the filename (click once), click the right mouse button, and choose "Download".
To stop a transfer in progress, click the "Commands" pull down menu and choose the "Stop" option.
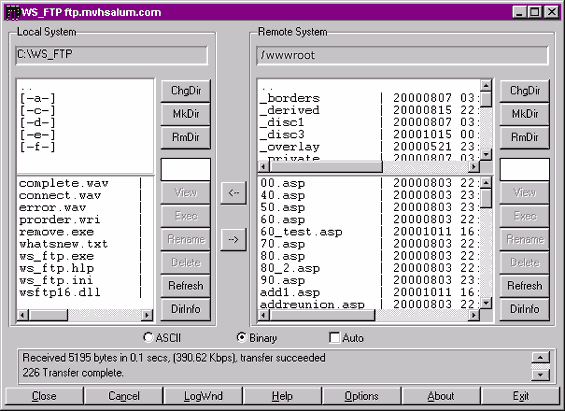
WS_FTP is a commonly used file transfer program with a graphical interface. The screen consists of three major areas: the "Local System", or your hard drive, and the "Remote System", or the machine you're connecting to, and the smaller status window at the bottom which tells you the status of your connection to the remote system. You may also go to http://www.ftpplanet.com/ftpresources/ftpmain.htm for more information on using WS_FTP.
Creating a New Server Connection
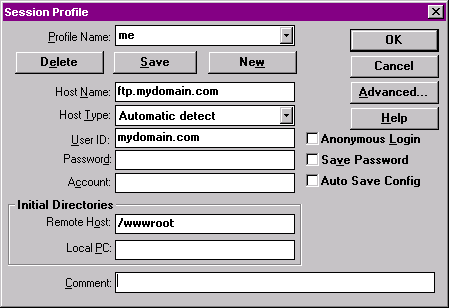
When you first start the program, a window called the "Session Profile" comes up with an existing connection. To create a new connection, click the "New" button and, in the top field under "Profile Name", put in the title (not the actual internet address) you want give to the connection. In the field titled "Host Name", put in the actual Internet address (either the name address or the numeric IP address) of the server you want to connect to. In the "Host Type" field, the "Automatic Detect" choice is the one to keep. Next, you need to put in your username and password on the remote system. Next, click the "Save Password" checkbox to the right to save your password. The "Account" field below can generally be left blank. If there is a particular directory on the remote host or on your hard drive that you need to come up in, put that directory in the "Remote Host" and "Local PC" windows in the "Initial directories" area. Click the "Auto Save Config" box and click the "Save" button close to the top.

Connecting To a Remote Server
To connect to a remote server after starting the program, just choose the server you want to connect to by clicking the down arrow to the right of the "Profile Name" field. To create a new connection, see above.
To bring up the session profile window without restarting the program, click the "Connect" button at the bottom of the window.
Disconnecting From a Remote Server
To disconnect from a server, click the "Close" button at the bottom (where the "Connect" button was before).
Directory and File Management
In the WS FTP window, even while not connected, you can manipulate files and switch, create, and delete directories in the local window by clicking the right mouse button over the "Local System" window or clicking the appropriate button to the right of the window. While connected, you can do the same things with the remote system you're connected to (i.e. create, delete files and directories) provide you have the permissions to do so.

Transferring Files To and From Remote Systems
While connected to a remote system, you can transfer files from the local directory in the window to the remote directory by double-clicking on the filename or highlighting it, right clicking, and choosing "Transfer File". Also, to receive files from the remote directory in the remote window, similarly either double-click the file or right click and choose "Transfer File". When transferring a file, a new window will come up showing the progress of the transfer.